How to Make Stock from Scratch: 3 Essential Recipes for Chicken, Beef & Vegetable
Homemade stock is the foundation of countless recipes and a game-changer when you meal prep for the week – having batches ready in your freezer transforms weeknight cooking. Once you learn how to make stock from scratch, you will never go back to the watery, oversalted shop-bought versions.
Making your own stock helps you save money – a batch costs pennies compared to shop-bought cartons, and the flavour is incomparably better. Stock made from bones you would otherwise throw away turns kitchen scraps into liquid gold.
As BBC Good Food explains, the key to great stock is patience – a gentle simmer extracts maximum flavour without making the liquid cloudy. This guide covers three essential recipes: classic chicken stock, rich roasted beef stock, and versatile vegetable stock. You will learn the techniques that professional chefs use, along with storage methods that keep your stock fresh for months.
What Is Stock and Why Make It from Scratch?
Stock is a flavourful liquid made by simmering bones, vegetables, and aromatics in water for several hours. The long cooking time extracts collagen from the bones, which converts to gelatin and gives properly made stock its rich, silky body.
Stock vs Broth: What Is the Difference?
The terms are often used interchangeably, but traditionally stock is made primarily from bones (giving it more body from gelatin), whilst broth is made from meat and has a lighter consistency. For home cooking purposes, the distinction matters less than technique – what matters is that your homemade version will taste dramatically better than anything from a carton.
When properly made, stock should set like jelly when refrigerated. This gelatinous quality comes from collagen in the bones and indicates a well-made stock with excellent body and mouthfeel.
What You Need to Make Stock from Scratch
The beauty of making stock is that it requires minimal equipment and uses ingredients you might otherwise discard.
Essential Equipment:
- Large stockpot (at least 8 litres / 8 quarts)
- Fine mesh sieve or colander
- Cheesecloth or muslin (optional, for clearer stock)
- Slotted spoon for skimming
- Large heatproof bowl or second pot
- Storage containers (glass jars or freezer bags)
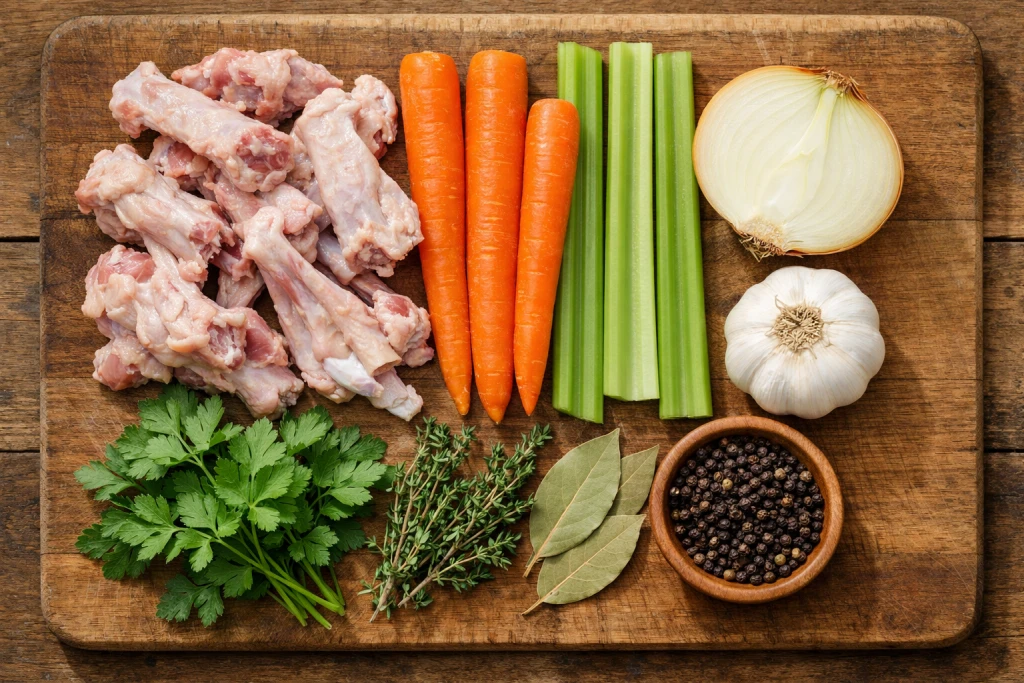
Basic Aromatics (Mirepoix):
- Onions – 2 medium, quartered (no need to peel)
- Carrots – 2 large, roughly chopped
- Celery – 3 stalks with leaves, roughly chopped
- Garlic – 4-5 cloves, smashed
- Fresh parsley stems
- Fresh thyme sprigs or 1 teaspoon dried
- Bay leaves – 2-3
- Whole black peppercorns – 1 teaspoon
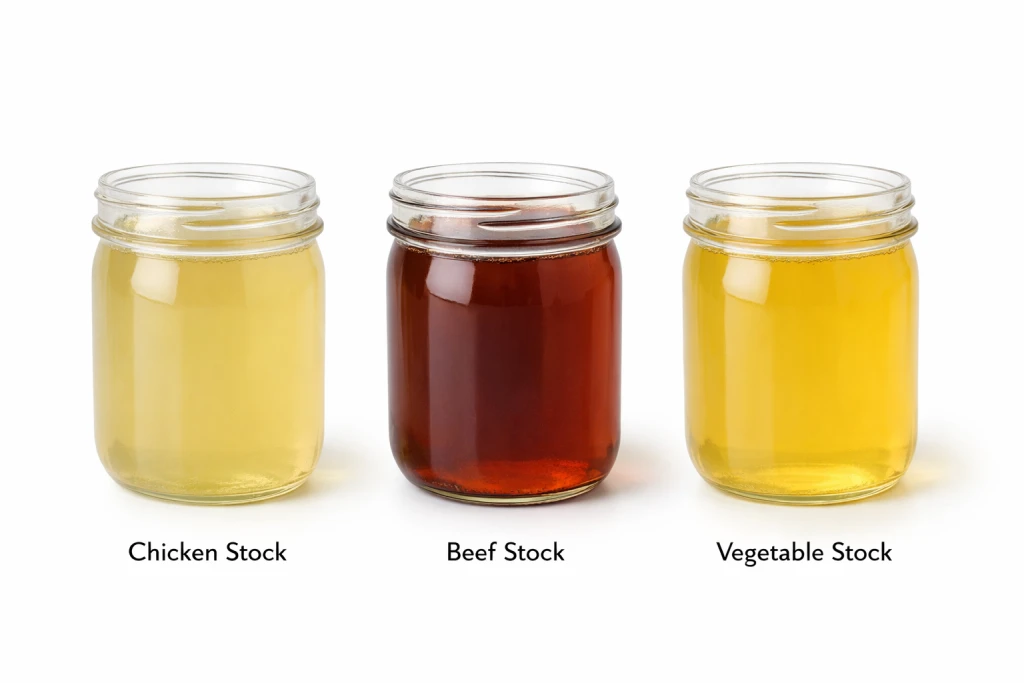
How to Make Chicken Stock: The Classic Method
Chicken stock is the most versatile variety and an excellent place to start. For the richest chicken stock, Serious Eats recommends starting with cold water and bringing it slowly to a simmer over 30 minutes. This gradual heating extracts more flavour and produces clearer stock.
Chicken Stock Ingredients
1.5-2 kg (3-4 lbs) chicken bones, carcasses, or wings
4 litres (4 quarts) cold water
Mirepoix vegetables (onion, carrot, celery)
Aromatics (garlic, parsley, thyme, bay leaves, peppercorns)
Step-by-Step Chicken Stock Method
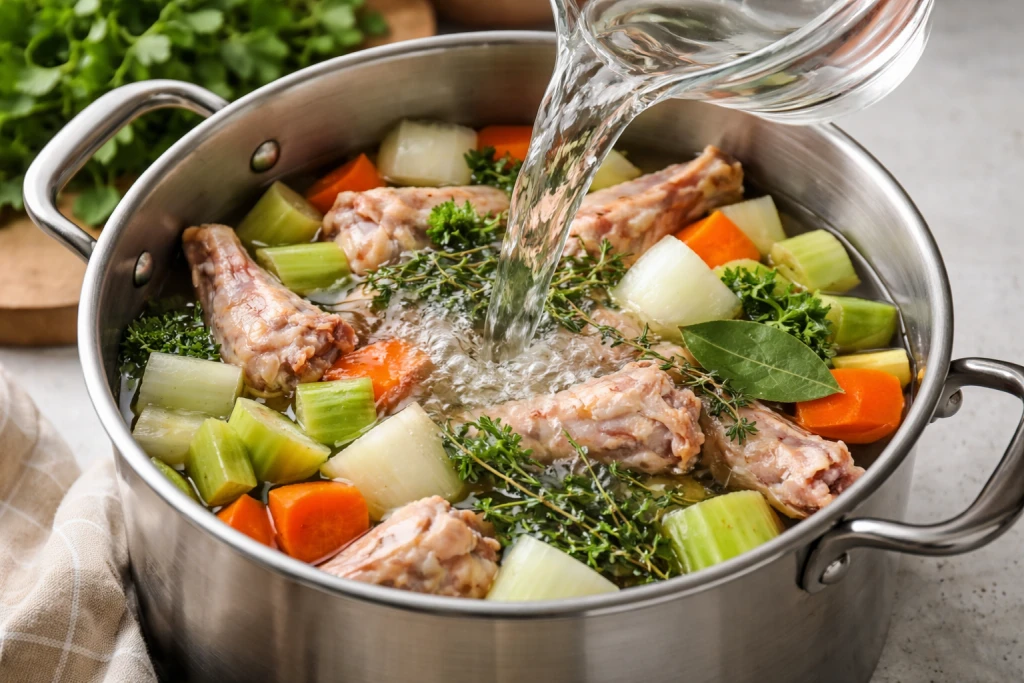
Step 1: Place chicken bones in your largest stockpot. Cover with cold water – the water should come 5-8cm (2-3 inches) above the bones.
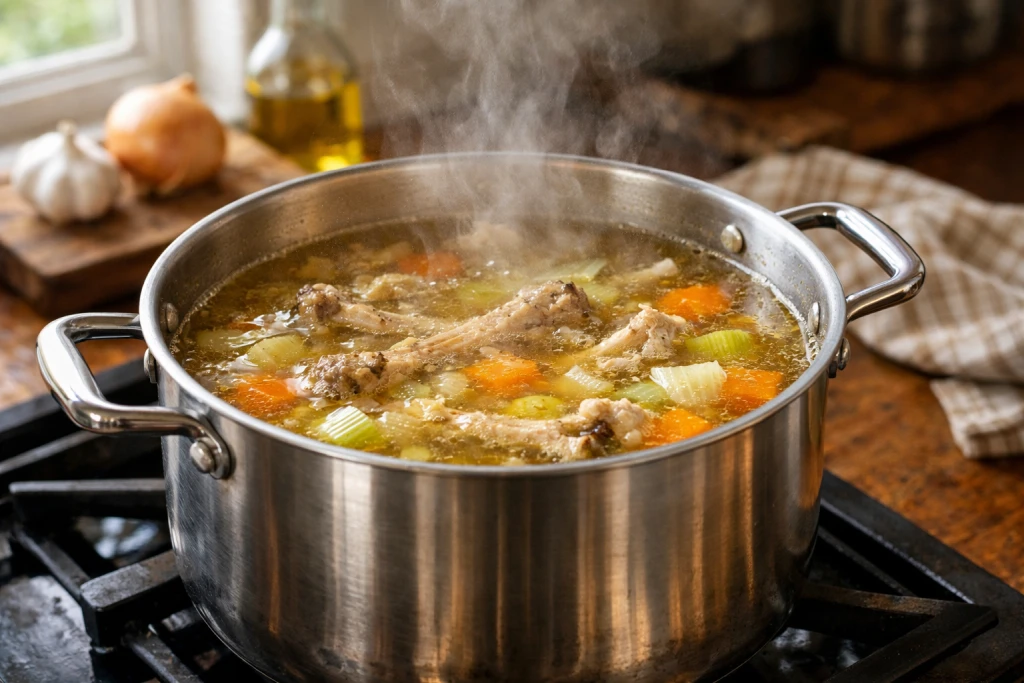
Step 2: Set pot over medium heat and bring slowly to a simmer. This should take about 30 minutes. Never let it reach a rolling boil.
Step 3: As the water heats, grey foam will rise to the surface. Skim this off with a slotted spoon – this removes impurities and keeps your stock clear. Skim every 15-20 minutes during the first hour.
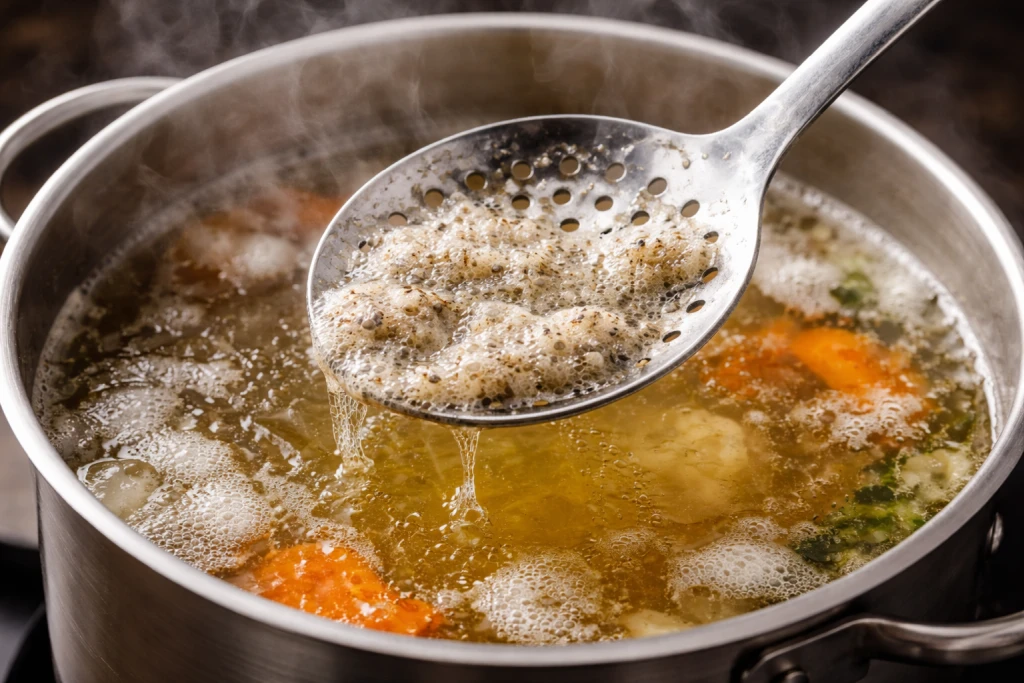
Step 4: Once skimmed, add vegetables and aromatics. Reduce heat to low and maintain a gentle simmer – you should see small bubbles occasionally breaking the surface, not vigorous bubbling.
Step 5: Simmer for 3-4 hours minimum, up to 6 hours for richer stock. Add water if the level drops below the bones.
Step 6: Strain through a fine mesh sieve into a clean pot or large bowl. Do not press on the solids – this makes stock cloudy.
Yield: Approximately 2.5-3 litres (2.5-3 quarts)
How to Make Beef Stock: Roasted Bones Method
Beef stock has a deeper, more robust flavour than chicken and benefits enormously from roasting the bones first. The Maillard reaction during roasting develops complex caramelised flavours that make the difference between ordinary and extraordinary stock.
Beef Stock Ingredients
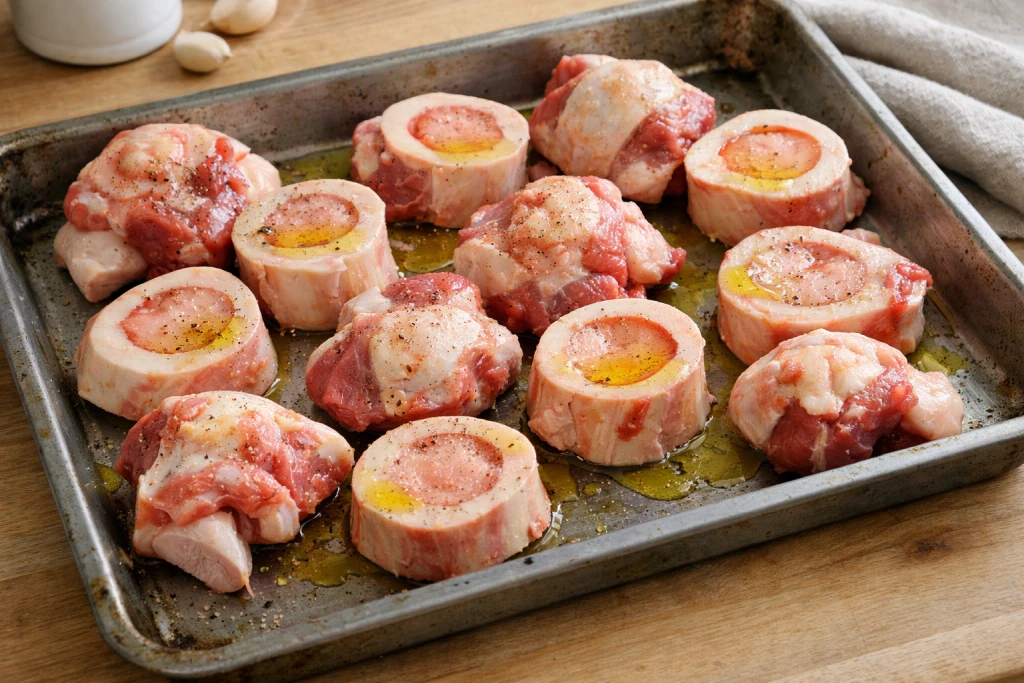
- 2 kg (4-5 lbs) beef marrow bones and knuckle bones
- 1 tablespoon tomato paste (optional – adds colour and depth)
- 5 litres (5 quarts) cold water
- Mirepoix vegetables (onion, carrot, celery)
- Aromatics (garlic, parsley, thyme, bay leaves, peppercorns)
Step-by-Step Beef Stock Method
Step 1 – Blanch (optional but recommended): Place bones in stockpot, cover with cold water, bring to a boil for 15-20 minutes. Drain, rinse bones, and discard water. This removes impurities for a cleaner-tasting stock.
Step 2 – Roast the bones: Preheat oven to 220°C (425°F). Arrange bones in a single layer on a roasting tray. Roast for 30 minutes.
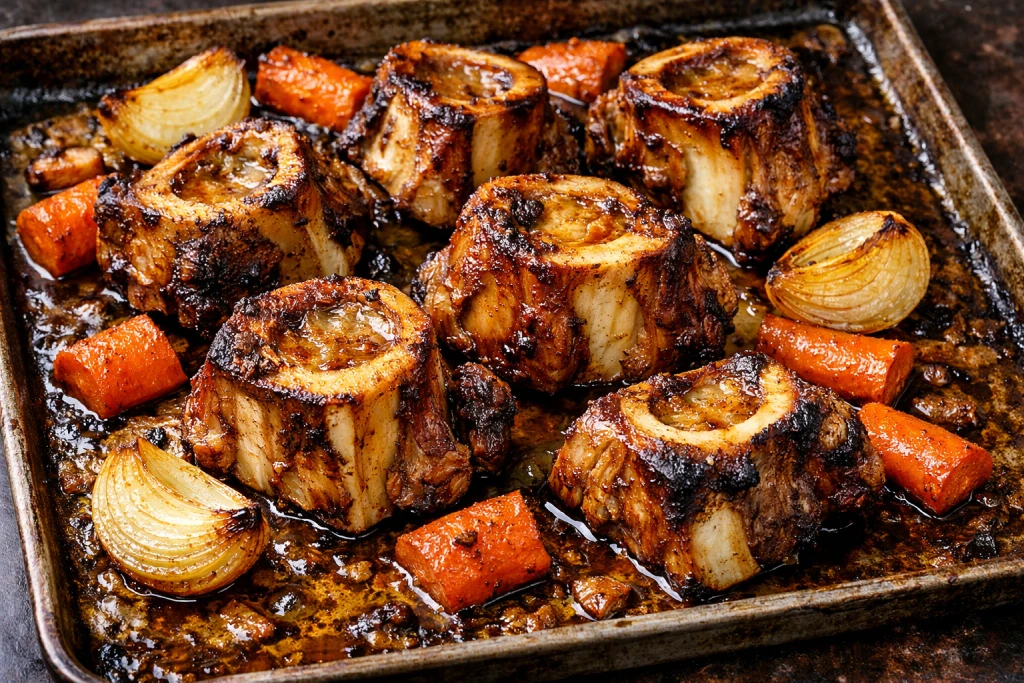
Step 3 – Roast vegetables: Turn bones, add carrots, onions, and celery to the tray. Brush bones with tomato paste if using. Roast another 20-30 minutes until everything is deeply caramelised but not burnt.
Step 4 – Deglaze the pan: Transfer bones and vegetables to your stockpot. Add a cup of water to the hot roasting tray and scrape up all the browned bits – these are packed with flavour. Pour this liquid into the pot.
Step 5 – Simmer: Cover with cold water, add remaining aromatics. Bring slowly to a simmer and cook for 6-8 hours minimum, up to 12 hours for bone broth. Skim foam periodically.
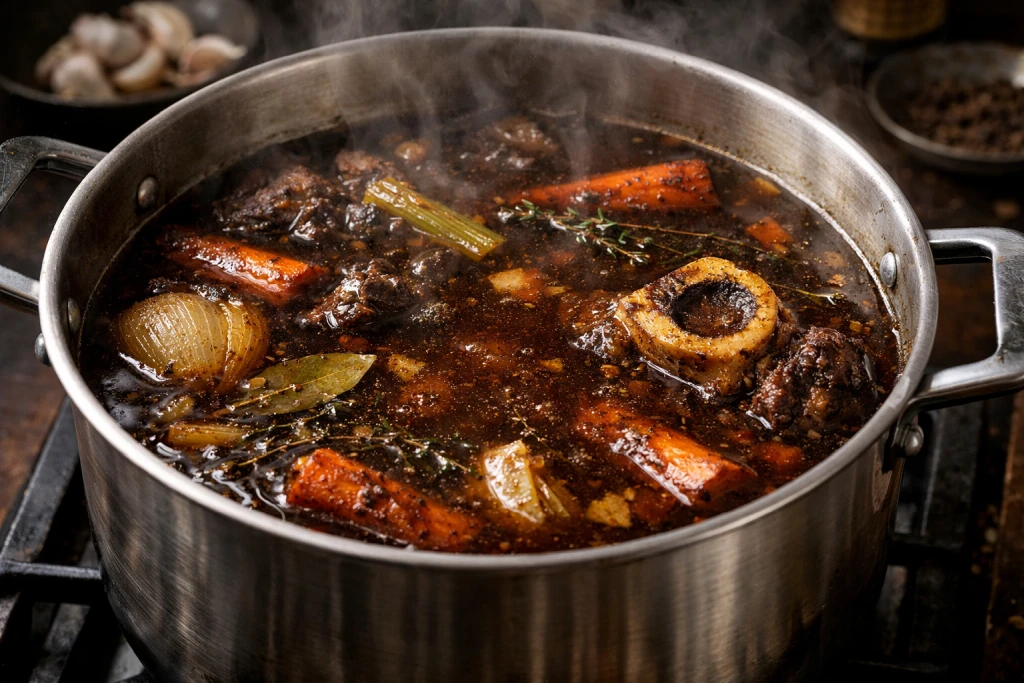
Step 6: Strain through a fine mesh sieve. The stock will be dark amber and incredibly rich.
Yield: Approximately 3-4 litres (3-4 quarts)
How to Make Vegetable Stock: Zero-Waste Method
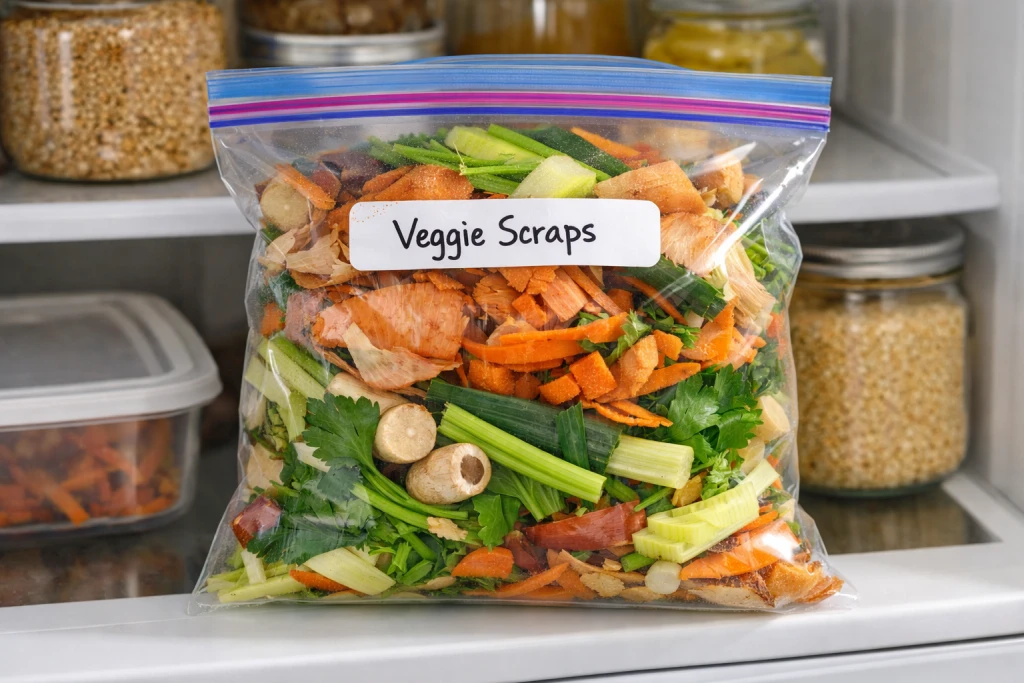
Vegetable stock is lighter and quicker to make than meat-based stocks. When you store fresh produce properly, save the trimmings in a freezer bag – onion ends, carrot peels, and celery leaves become the base for flavourful vegetable stock.
Vegetable Stock Ingredients
- 2 large onions, quartered
- 4 carrots, roughly chopped (do not use too many – makes stock sweet)
- 4 celery stalks with leaves
- 1 leek, sliced (or leek tops saved from other cooking)
- 200g (7 oz) mushrooms (adds umami depth)
- 4 garlic cloves, smashed
- Fresh parsley and thyme
- 2 bay leaves
- 1 teaspoon whole peppercorns
- 3 litres (3 quarts) cold water
Vegetables to Avoid in Stock
Do NOT include these vegetables – they make stock bitter or off-flavoured:
Broccoli, cauliflower, cabbage, Brussels sprouts (all brassicas)
Beetroot (turns stock pink)
Potatoes (makes stock starchy and cloudy)
Turnip or swede in large amounts (too strong)
Artichokes
Step-by-Step Vegetable Stock Method
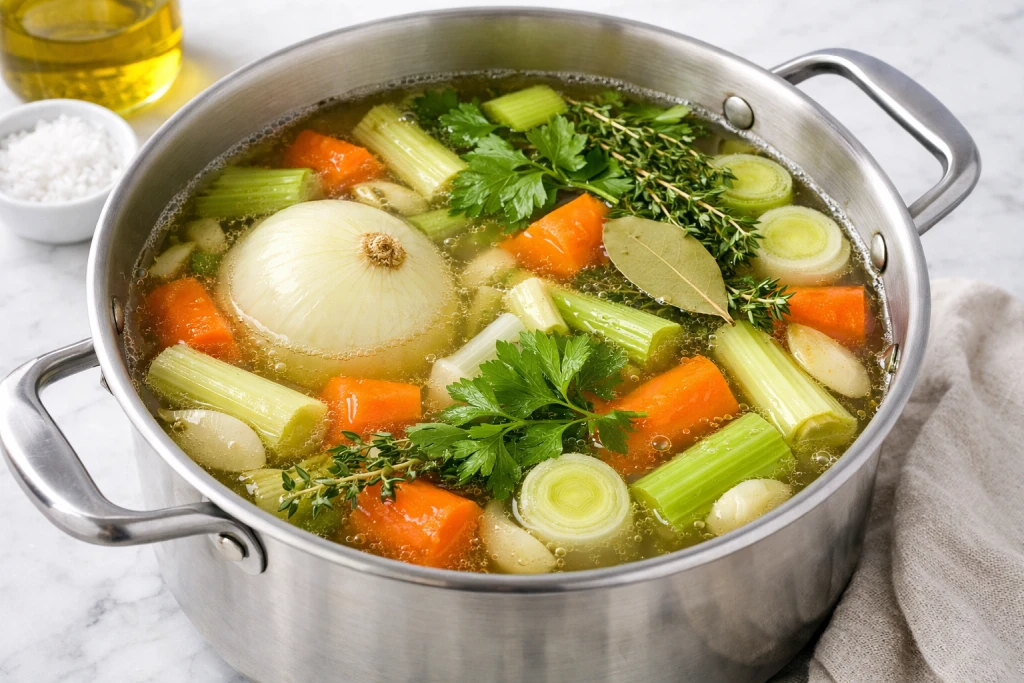
Step 1: Place all vegetables, aromatics, and herbs in a large pot. Cover with cold water.
Step 2: Bring to a boil, then reduce heat and simmer for 45 minutes to 1 hour. Unlike meat stocks, vegetable stock becomes bitter if simmered too long.
Step 3: Strain through a fine mesh sieve. Do not press vegetables – this clouds the stock.
Yield: Approximately 2 litres (2 quarts)
How to Strain and Check Stock Quality

Proper straining is essential for clear, clean-tasting stock.
Straining method: Set a fine mesh sieve over a large bowl or clean pot. For crystal-clear stock, line the sieve with cheesecloth or a clean muslin cloth. Ladle the stock through – do not pour, as this disturbs sediment at the bottom. Never press or squeeze the solids.
The Gelatin Test: How to Know Your Stock Is Good
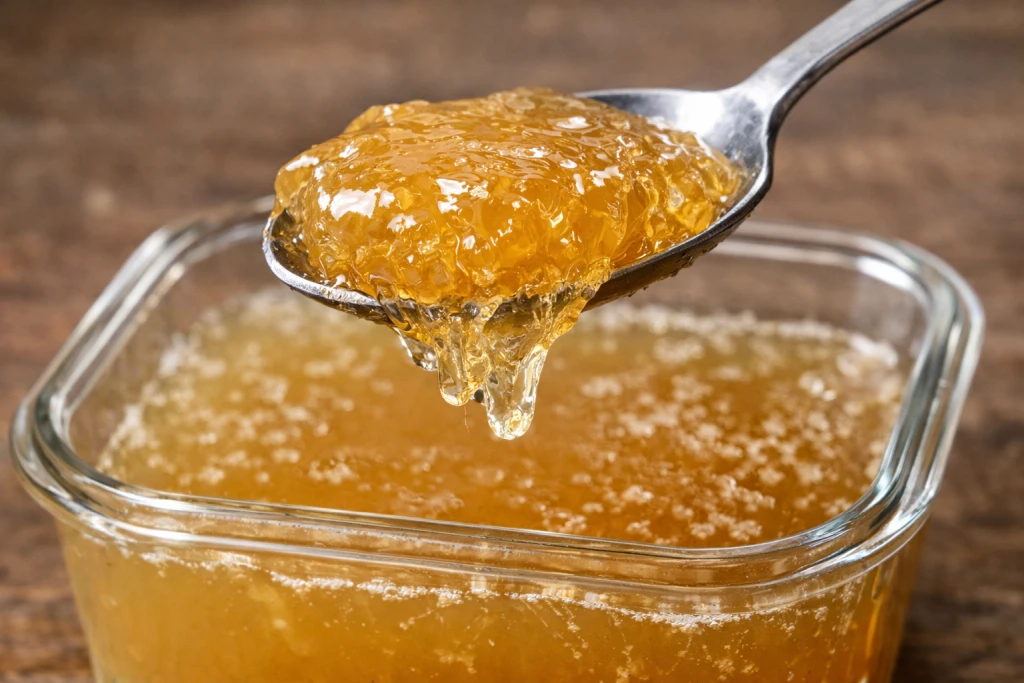
The mark of excellent stock is gelatin content.
After refrigerating overnight, your stock should:
- Set like soft jelly when cold
- Wobble when you shake the container
- Leave a slightly sticky feeling on your lips when tasted
- Return to liquid when gently reheated
- If your stock does not gel, it is still usable but indicates the bones did not have enough collagen or the simmer time was too short. Chicken feet and pig trotters are excellent for adding extra gelatin.
How to Store Homemade Stock
Proper storage ensures your stock stays fresh and safe. According to food safety guidelines, homemade stock keeps 3-4 days in the refrigerator or up to 3-4 months in the freezer.
Cooling Stock Safely
- Hot stock must cool quickly to prevent bacterial growth:
- Place pot in a sink of ice water, stirring occasionally
- Divide into smaller, shallow containers for faster cooling
- Stock should be refrigerated within 2 hours of cooking
- Never put hot stock directly in the refrigerator – it raises the temperature dangerously
Removing the Fat
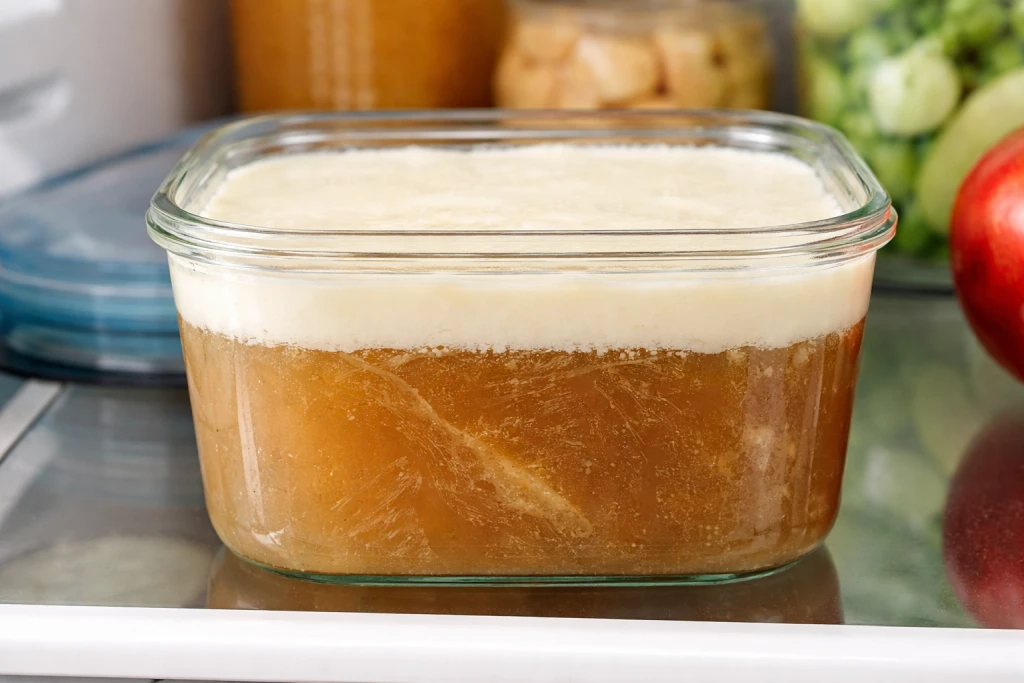
- When refrigerated, fat rises and solidifies on top of the stock. This white layer actually protects the stock underneath. Remove it before using:
- Use a spoon to lift off the solid fat in pieces
- Save chicken fat (schmaltz) for cooking – excellent for roasting potatoes
- Never pour hot fat down your kitchen drain – let it solidify, scrape it off, and dispose in the bin to avoid plumbing problems
Refrigerator Storage
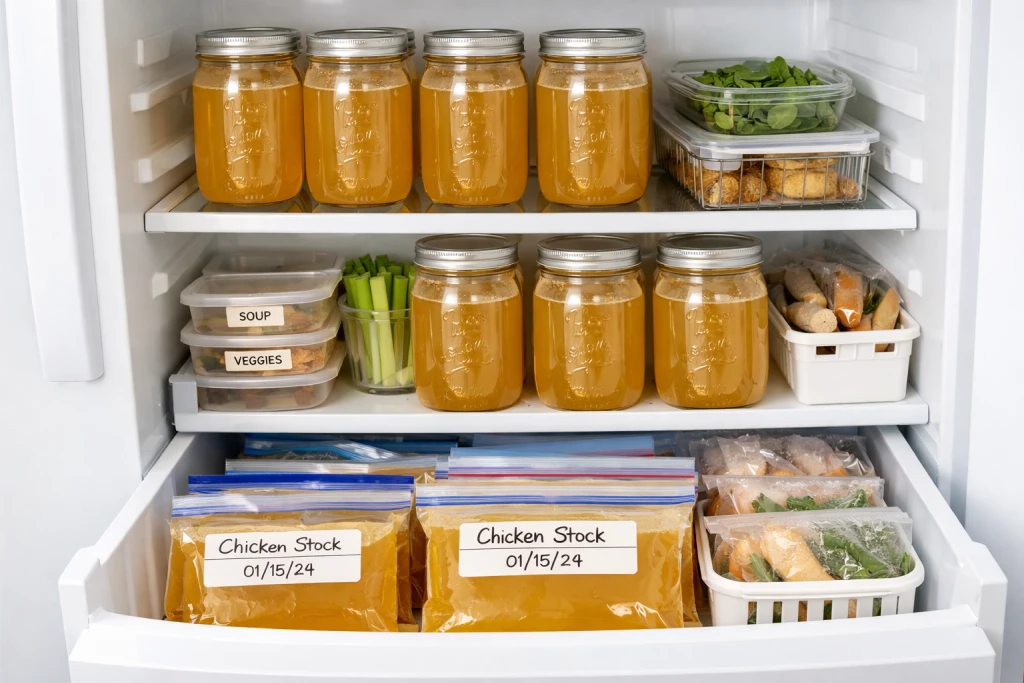
- Store in glass jars or airtight containers
- Leave the fat layer on until ready to use (it seals the stock)
- Use within 3-4 days
- If stock develops an off smell or mould, discard it
Freezer Storage
- Freezing is the best option for longer storage:
- Use freezer-safe containers or heavy-duty freezer bags
- Leave 2.5cm (1 inch) headspace for expansion
- Freeze flat in bags for easy stacking and faster thawing
- Label with type and date
- Frozen stock keeps 3-4 months (up to 6 months at -18°C / 0°F)
The Ice Cube Tray Method
For convenient small portions:
Pour cooled stock into ice cube trays
Freeze until solid (about 4 hours)
Pop cubes into a freezer bag
Each cube equals approximately 2 tablespoons – perfect for deglazing pans or adding to sauces
Troubleshooting Common Stock Problems
Problem: Cloudy stock
Cause: Boiling too hard, not skimming foam, or pressing solids when straining. Fix: Cannot fix cloudy stock, but it still tastes fine. Next time, maintain gentle simmer and strain without pressing.
Problem: Weak, watery flavour
Cause: Too much water, not enough bones, insufficient simmer time. Fix: Simmer uncovered to reduce and concentrate. Next time, use more bones and less water.
Problem: Stock does not gel
Cause: Insufficient collagen from bones, simmer time too short. Fix: Still usable, but add a packet of gelatin if body is important for your recipe. Next time, add chicken feet or longer simmering.
Problem: Bitter taste
Cause: Burnt bones during roasting, brassicas in vegetable stock, or simmering vegetable stock too long. Fix: Cannot fix bitterness. Next time, watch roasting closely and follow timing guidelines.
Problem: Greasy film on surface
Cause: Fat not removed. Fix: Refrigerate and remove solidified fat layer. Some fat is normal and adds flavour.
Frequently Asked Questions About Making Stock
What is the difference between stock and broth?
Stock is made primarily from bones and has more body from gelatin. Broth is made from meat and is lighter. In practice, the terms are used interchangeably for home cooking.
How long should stock simmer?
Chicken stock: 3-6 hours. Beef stock: 6-12 hours (up to 24 hours for bone broth). Vegetable stock: 45 minutes to 1 hour maximum.
Do I need to roast bones first?
For beef stock, roasting is highly recommended – it develops deeper, more complex flavours. For chicken stock, roasting is optional but creates richer colour and taste.
Can I use a rotisserie chicken carcass?
Absolutely. Save carcasses from roast chickens in the freezer until you have 2-3. The roasted flavour adds depth. You can also add raw wings or backs for extra body
Should I add salt to stock?
No, or very little. Stock is a base ingredient that will be reduced and seasoned in your final dish. Adding salt during cooking can result in over-salted final dishes.
Can I make stock in a slow cooker or Instant Pot?
Yes. Slow cooker: cook on low for 10-12 hours. Instant Pot: cook at high pressure for 30 minutes (chicken) to 60-90 minutes (beef), then natural release.
Why is my stock cloudy?
Stock becomes cloudy from boiling too vigorously (which emulsifies fats) or from pressing solids when straining. Always maintain a gentle simmer and pour stock gently through the strainer.
What vegetables should I avoid in stock?
Avoid brassicas (broccoli, cabbage, cauliflower), which become bitter. Also avoid beetroot (colours stock pink), potatoes (makes stock starchy), and strong-flavoured vegetables like artichokes.
How long does homemade stock last?
Refrigerated: 3-4 days. Frozen: 3-4 months (up to 6 months in a deep freezer at -18°C / 0°F).
Is bone broth good for health?
Bone broth contains collagen, gelatin, and minerals. Some studies suggest glycine in bone broth may help you sleep better – a warm mug before bed has become a popular wellness ritual. However, health claims vary and more research is needed.
Conclusion
Learning how to make stock from scratch opens up a world of culinary possibilities. With golden chicken stock for soups and risottos, rich beef stock for stews and gravies, and versatile vegetable stock for lighter dishes, you have the foundation for countless delicious meals.
The process is simple: combine bones or vegetables with aromatics, simmer gently for the appropriate time, strain carefully, and store properly. The minimal effort pays off enormously in flavour – nothing from a carton comes close to the depth and body of homemade stock.
Start with chicken stock using a leftover roast chicken carcass. Once you taste the difference, you will find yourself saving bones, collecting vegetable scraps, and building a freezer full of liquid gold. Your soups, sauces, and cooking will never be the same.